
Learn how to make lotion bars with chamomile infused oil. This hard lotion bar recipe is great for dry skin, and it is simple to make with shea butter, beeswax, and chamomile infused oils. Beeswax lotion bars are no mess and won’t spill. They are moisturizing thanks to the oils, and you’ll love how soft they make your skin.
How to Make Lotion Bars
My dad and step mom got me an Instant Pot a few years ago. Most people use them to make dinner; I made a solid lotion bar recipe.
You need a double boiler to make beeswax lotion bars because you can’t heat the oils over direct heat.
However, I found that the keep warm setting on the Instant Pot does a great job keeping a lot and even temperature.
You don’t need an Instant Pot to make the best lotion bar recipe. You will need a double boiler or a glass bowl to use in the microwave if you don’t want to use your Instant Pot.
For more DIY recipes that are perfect for beginners, check out these posts:
- Natural Solid Perfume Recipe
- Lavender Milk Bath Recipe
- How to Make Creamy Body Butter
- Homemade Peppermint Lip Balm Recipe
- How to Make Calendula Salve
- Dandelion Solid Lotion Bar
- Bug Repellent Solid Lotion Bars
- Massage Melts Recipe

What is a Solid Lotion Bar?
Making lotion from scratch involves oils and water, so you need an emulsifier and a preservative. It’s not a great DIY for beginners.
However, a DIY lotion bar only has oils in it, so you don’t need to worry about a preservative or emulsifier.
A shea butter lotion bar recipe is solid at room temperature. When you press it against your skin, it melts slightly so you can rub the oils and butters on your skin as a moisturizer.
How Do You Use a Solid Lotion Bar?
You can use a solid lotion bar recipe anywhere on your skin except the face. It’s too oily for your facial skin and can cause breakouts.
Simply hold the beeswax lotion bars on your skin and glide it around. The shea butter and beeswax melt slightly from your body heat.
You can then rub in the oils and shea butter if you want.

Do You Need Beeswax for Lotion Bars?
No, you do not have to use beeswax for lotion bars. However, I like to make a beeswax lotion bar recipe because it forms a barrier on top of your skin. This barrier traps the oil and butter on your skin to moisturize your skin.
Beeswax is also a natural humectant, so it can pull moisture from the air to your skin.
You can make a solid lotion bar recipe without beeswax by using cocoa butter or candelilla wax. You will need to play with the recipe because cocoa butter and candelilla wax are not the same hardness as beeswax.
How Do You Make Lotion Bars Less Greasy?
Lotion bars are made of oils and butters, so they are greasy by nature. However, I made a shea butter lotion bar recipe so it’s not as greasy.
Shea butter is very moisturizing, but it doesn’t leave your skin feeling oily.
You can also use carrier oils that have a faster absorption rate like apricot kernel oil, grapeseed oil, or safflower oil.
You can add a pinch of arrowroot powder to the melted oils to make your DIY lotion bar less greasy.

Can You Add Color to Lotion Bars?
Yes, you can use mica powder to add color to lotion bars. Keep in mind that you will get lighter pastel colors and not bright or vivid colors.
Don’t use any water based colorant like food coloring because it will not combine with the oils.
How Do You Make Lotion Bars Softer? How Do I Make My Lotion Bar Harder?
The hardness of your DIY lotion bar really depends on the beeswax and shea butter. I’ve found that my Crafty Bubbles beeswax is harder than the Simply Earth beeswax. The Simply Earth beeswax tends to melt quicker than my Crafty Bubbles beeswax too.
That doesn’t mean that one is better or worse than another one. They are just different. I’ve had readers email that they got different results, and this is likely why it turned out different for you.
Shea butter can also have a different consistency. I only use Crafty Bubbles shea butter and don’t use any other brand. I’ve seen a popular brand in a craft store, and it’s as hard as a rock. I’m not convinced it’s pure shea butter, but I digress.
You can use more oil to make your hard lotion bar recipe softer or add more beeswax or shea butter to your beeswax lotion bar recipe to make it harder.
You can remelt this solid lotion bar recipe. If it’s not the right hardness for you, simply remelt it and add more beeswax or oil and pour again.

How Long Does it Take For Lotion Bars to Harden?
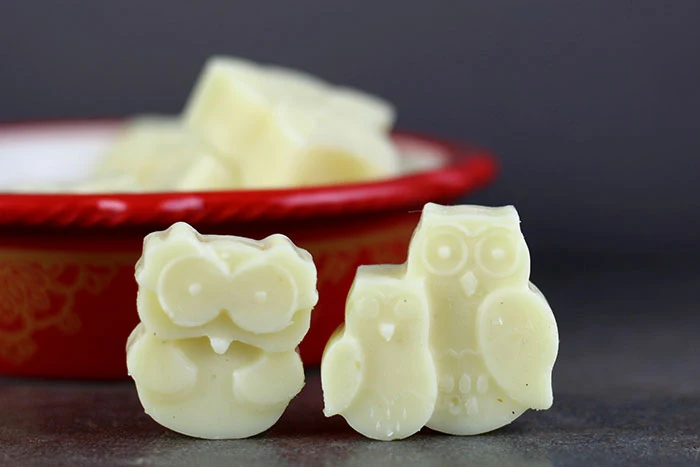
That depends on the size of your DIY lotion bar. I poured this shea butter lotion bar recipe in a small owl mold, so they were done in a few hours.
However, if you use a larger mold, it can take longer. I always recommend leaving them in the mold overnight to set up.
Do Lotion Bars Need Preservatives?
No, you do not need to use a preservative to learn how to make lotion bars. There’s no water in this hard lotion bar recipe, so there’s no need for a preservative.
How Long Do Homemade Lotion Bars Last?
Your solid lotion bar recipe will last as long as the shelf life of the oil. Oils can go rancid, and they last between 6 months and 2 years.
If you noticed that your DIY lotion bar smells off, it’s time to make a new hard lotion bar recipe.

How to Infuse Herbs and Oils
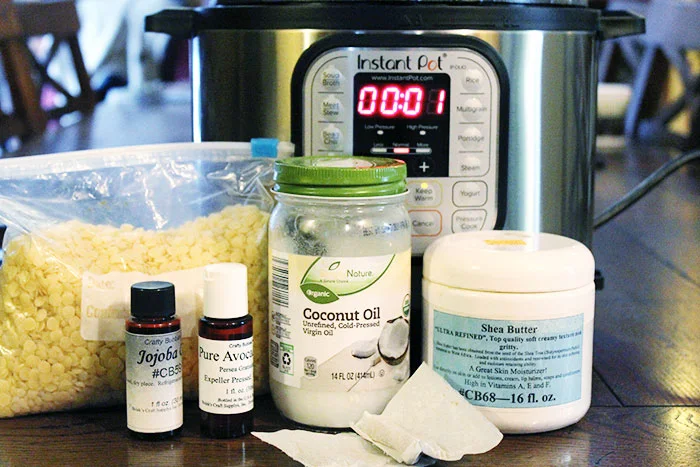
I used my Instant Pot to infuse the chamomile and oils for my beeswax lotion bar recipe. Since coconut oil is solid at room temperature, you will need to use heat to infuse it.
You can also infuse the oils and chamomile in a mason jar by setting it in warm water on the stove or in a slow cooker.
Learn more about how to infuse herbs and oils here.
DIY Lotion Bar Ingredients
You will need the following to learn how to make lotion bars:
- Coconut Oil - Coconut oil is a solid at room temperature, but it melts on contact with your skin. It helps maintain the right hardness of this solid lotion bar recipe. Coconut oil is absorbed into your skin, so it helps moisturize your skin.
- Avocado Oil - I really like avocado oil for dry skin. It is a heavier oil, but it helps relieve dry skin while moisturizing the skin.
- Jojoba Oil - Jojoba oil is also excellent for dry skin. It’s a more expensive oil, so I often combine it with other oils.
- Chamomile - Chamomile is a mild herb, and it’s great for soothing irritated skin. You can use dried chamomile or use chamomile tea bags. I simply used tea bags so I didn’t have to strain the buds out of my infusion.
- Shea Butter - Shea butter is solid at room temperature, but it melts at skin temperature. It’s non greasy, yet it’s very moisturizing for your skin.
- Beeswax - Beeswax firms the solid lotion bar recipe and helps hold the oils on your skin.
- Owl Silicone Mold - I like using silicone molds for my solid lotion bar recipe.
How Do You Make Lotion Bars?
Step #1
Turn the Instant Pot on the keep warm setting. Place the coconut oil, avocado oil, and jojoba oil in the pot. Add the tea bags. When the coconut oil melts completely, stir the tea bags and oil to help the tea diffuse in the oil. The oil won't be deep, so this helps get it going. Let sit for 30 minutes with the lid on the Instant Pot.
Alternatively, you can add the oils and tea bags to a mason jar. Then set the mason jar on a mason jar ring and place in a pan of water. The water should reach the top of the oil. Heat over medium low heat so the water is hot but not boiling or simmering. Let sit for 30 minutes.

Step #2
After 30 minutes, the oils should take on a deeper hue. Remove the tea bags and discard. You can squeeze them to get out any excess oil, but be careful. I find it best to use two spoons or even a pair of tongs to squeeze out the oil.
Step #3
Add the shea butter and beeswax to the Instant Pot. Use the keep warm setting until it's all melted.
If you infused the oils on the stove, add the shea butter and beeswax and continue to heat over medium low heat until the beeswax is fully melted.

Step #4
Once everything is melted, stir well. Carefully remove the liner or the mason jar from the water. It will be hot, so use a hot pad.
Step #5
Quickly pour the lotion into a mold. I used a cute owl mold so I could have several smaller lotion bars, but you could make them any size. You can use a silicone soap mold, too.
Step #6
Let sit until hard. Mine took about an hour because my molds were small. If you use a larger mold, it could take 3-5 hours. The lotion should pop right out of the mold once it's cool. If it doesn't, put them in the freezer for 10 to 15 minutes and try again.
Now you know how to make lotion bars!
Like this post? Pin it!


Chamomile Solid Lotion Bar Recipe
materials:
- 1/4 cup coconut oil
- 1 tablespoon avocado oil
- 1 tablespoon jojoba oil
- 2 chamomile tea bags
- 1/4 cup shea butter
- 1/2 cup beeswax
tools:
- Double Boiler, Mason Jar, or Instant Pot
- Measuring Cups
- Spoons
steps:
- Turn the Instant Pot on the keep warm setting. Place the coconut oil, avocado oil, and jojoba oil in the pot. Add the tea bags. When the coconut oil melts completely, stir the tea bags and oil to help the tea diffuse in the oil. The oil won't be deep, so this helps get it going. Let sit for 30 minutes with the lid on the Instant Pot. Alternatively, you can add the oils and tea bags to a mason jar. Then set the mason jar on a mason jar ring and place in a pan of water. The water should reach the top of the oil. Heat over medium low heat so the water is hot but not boiling or simmering. Let sit for 30 minutes.
- After 30 minutes, the oils should take on a deeper hue. Remove the tea bags and discard. You can squeeze them to get out any excess oil, but be careful. I find it best to use two spoons or even a pair of tongs to squeeze out the oil.
- Add the shea butter and beeswax to the Instant Pot. Use the keep warm setting until it's all melted. If you infused the oils on the stove, add the shea butter and beeswax and continue to heat over medium low heat until the beeswax is fully melted.
- Once everything is melted, stir well. Carefully remove the liner or the mason jar from the water. It will be hot, so use a hot pad.
- Quickly pour the lotion into a mold. I used a cute owl mold so I could have several smaller lotion bars, but you could make them any size. You can use a silicone soap mold, too.
- Let sit until hard. Mine took about an hour because my molds were small. If you use a larger mold, it could take 3-5 hours. The lotion should pop right out of the mold once it's cool. If it doesn't, put them in the freezer for 10 to 15 minutes and try again.
